
Notice
Recent Posts
Recent Comments
Link
| 일 | 월 | 화 | 수 | 목 | 금 | 토 |
|---|---|---|---|---|---|---|
| 1 | 2 | 3 | 4 | 5 | 6 | 7 |
| 8 | 9 | 10 | 11 | 12 | 13 | 14 |
| 15 | 16 | 17 | 18 | 19 | 20 | 21 |
| 22 | 23 | 24 | 25 | 26 | 27 | 28 |
Tags
- 시각화
- 서평
- 독후감
- Pandas
- 매틀랩
- python visualization
- Linux
- 한빛미디어
- Blog
- tensorflow
- 리눅스
- Python
- Google Analytics
- 서평단
- 파이썬 시각화
- 한빛미디어서평단
- MATLAB
- 딥러닝
- 텐서플로
- Tistory
- 파이썬
- 월간결산
- Ga
- Visualization
- matplotlib
- SQL
- 통계학
- MySQL
- 티스토리
- 블로그
Archives
- Today
- Total
pbj0812의 코딩 일기
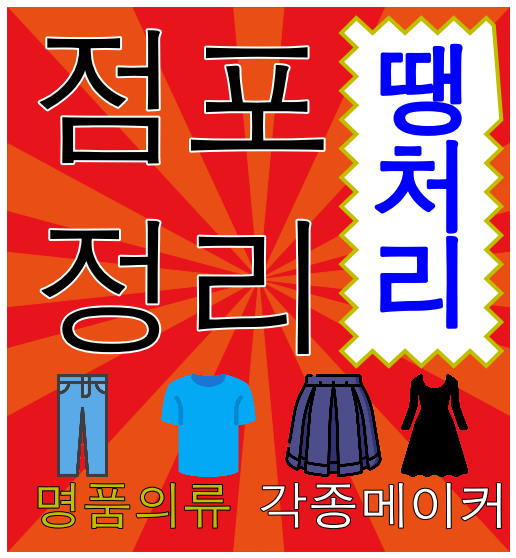
[PYTHON] matplotlib 으로 전단지 만들기 본문
0. 목표
- matplotlib 으로 전단지 만들기

1. 실습
1) library 호출
import matplotlib.pyplot as plt
# 한글폰트
from matplotlib import rc
rc('font', family='AppleGothic')
plt.rcParams['axes.unicode_minus'] = False
# text 꾸미기
import matplotlib.transforms as mtransforms
import matplotlib.patches as mpatch
from matplotlib.patches import FancyBboxPatch
# image
import matplotlib.image as mpimg
from matplotlib.offsetbox import OffsetImage, AnnotationBbox
# text 바깥라인
import matplotlib.patheffects as PathEffects
2) 이미지 가져오기
trousers = mpimg.imread('/Users/pbj0812/Desktop/trousers.png')
shirt = mpimg.imread('/Users/pbj0812/Desktop/shirt.png')
skirt = mpimg.imread('/Users/pbj0812/Desktop/skirt.png')
dress = mpimg.imread('/Users/pbj0812/Desktop/dress.png')
3) 그림 그리기
# 도화지
fig, ax = plt.subplots()
fig.set_size_inches(9, 10)
ax.axis('off')

# 배경 꾸미기
ax.set_xlim(-10, 10)
ax.set_ylim(-10, 10)
ax.fill_between([-10, 10], [10, 10], [-10, -10], color = '#E94E15')
ax.fill_betweenx([10, 0], [0, 0], [-5, 0], color = '#E7141B')
ax.fill_betweenx([10, 0], [0, 0], [5, 0], color = '#E7141B')
ax.fill_betweenx([10, 0], [0, 0], [-1, 0], color = '#E94E15')
ax.fill_betweenx([10, 0], [0, 0], [1, 0], color = '#E94E15')
ax.fill_betweenx([-10, 0], [0, 0], [-5, 0], color = '#E7141B')
ax.fill_betweenx([-10, 0], [0, 0], [5, 0], color = '#E7141B')
ax.fill_betweenx([-10, 0], [0, 0], [-1, 0], color = '#E94E15')
ax.fill_betweenx([-10, 0], [0, 0], [1, 0], color = '#E94E15')
ax.fill_between([-10, 10], [10, -10], [-10, 10], color = '#E7141B')
ax.fill_between([-10, 10], [5, -5], [-5, 5], color = '#E94E15')
ax.fill_between([-10, 10], [2.5, -2.5], [-2.5, 2.5], color = '#E7141B')
ax.fill_between([-10, 10], [1, -1], [-1, 1], color = '#E94E15')

# 텍스트 꾸미기
font1 = {
      'style' : 'italic',
      'color' :  'k',
      'size' : 150}

font2 = {
      'style' : 'italic',
      'color' :  'b',
      'weight' : 'bold',
      'size' : 100}

txt1 = ax.text(-9, 9, '점포\n정리', verticalalignment='top', fontdict = font1)
txt1.set_path_effects([PathEffects.withStroke(linewidth=4, foreground='w')])
txt1.set_linespacing(1.4)

txt2 = ax.text(4.5, 8.5, '땡\n처\n리', verticalalignment='top', fontdict = font2, bbox=dict(boxstyle='sawtooth', fc="w", ec="y", linewidth = 4))
txt2.set_path_effects([PathEffects.withStroke(linewidth=4, foreground='b')])
txt2.set_linespacing(1.0)

txt3 = ax.text(-9, -9,'명품의류', size=50, color='y')
txt3.set_path_effects([PathEffects.withStroke(linewidth=2, foreground='k')])

txt4 = ax.text(0, -9,'각종메이커', size=50, color='w')
txt4.set_path_effects([PathEffects.withStroke(linewidth=2, foreground='k')])

# 이미지 붙이기
trousers1 = OffsetImage(trousers, zoom = 0.2)
ab = AnnotationBbox(trousers1, (-7, -5.4), frameon = False)
ax.add_artist(ab)

shirt1 = OffsetImage(shirt, zoom = 0.2)
ab = AnnotationBbox(shirt1, (-2, -5.4), frameon = False)
ax.add_artist(ab)

skirt1 = OffsetImage(skirt, zoom = 0.2)
ab = AnnotationBbox(skirt1, (3, -5.4), frameon = False)
ax.add_artist(ab)

dress1 = OffsetImage(dress, zoom = 0.2)
ab = AnnotationBbox(dress1, (7, -5.4), frameon = False)
ax.add_artist(ab)
- 결과
2. 참고
- Add border around text with matplotlib
'ComputerLanguage_Program > PYTHON' 카테고리의 다른 글
| [PYTHON] GridSpec 을 이용한 여러 그래프를 같이 그리기 (0) | 2021.08.17 |
|---|---|
| [PYTHON] 태극문양 그리기 (2) | 2021.08.16 |
| [PYTHON] indicate_inset_zoom 을 이용한 줌 인 (0) | 2021.08.12 |
| [PYTHON] table 을 사용하여 그래프와 테이블을 같이 그리기 (0) | 2021.08.11 |
| [PYTHON] floweaver 를 이용한 sankey 그래프 그리기 (0) | 2021.08.10 |
'ComputerLanguage_Program/PYTHON' Related Articles
more


Comments